Jekyll Comments by Disqus, Google and Facebook
Feb 11, 2016 - sharathdt
Jekyll comments is not available by default. Unlike WordPress, We have to integrate third party commenting tools like disqus, facebook, google to Jekyll blog.
When you write an opinion in your blog, there can be mixed reactions from your readers. There are people who agree with you, there are some who may not agree with you and there are few who may have a different opinion all together. But how will you know what their opinion is if you don’t give them the option to express!?
There comes our comment box to the rescue. But there are a lot of them. You have to choose the one that suits your website. Suppose if you are active only on facebook, you can choose facebook comment box. If you have Google users as your readers then it would be a wise option to put a Google comment box.
It depends on your requirements. What kind of users you have. Suppose if you don’t care about user reactions then there is no need to keep a comment box!
WordPress has an upper hand
WordPress comes with a nice default comment box and you can get other ones through plugins if you don’t like the default one. But if you want to place the comment box a little above than the position it is already in then you are in trouble!
Editing plugins in WordPress are really hard unless you are an expert in php and know where to look for the changes. I have tried it and I can tell you that it is not a good experience.
WordPress comments otherwise work great, you have nothing to code and most of the bloggers use it. But if you have made a choice to move from WordPress to Jekyll (which I would really appreciate) then you can install one of these comment boxes on your blog.
I can guarantee you that they are easy to implement. And you will have the full control of how they look and behave (for the most parts). So let’s dive right in.
There are many ways to add a comment box to Jekyll. I will be discussing only the major ones.
1. Disqus
2. Google
3. Facebook
1. Disqus
Disqus has been my favorite so far. It is simple, minimal and robust. I haven’t faced any problem with this one so far. I recommend Disqus than any other Jekyll blog comments tool.

The best part of Disqus is that it allows users to comment using facebook, twitter, Google plus or just using an email address! Moreover, if you have a bunch of blogs, you can have different comment boxes for them and manage it from a single account!

Here are the steps to implement Disqus comment box in your Jekyll blog.
Step 1: Sign up
This step is pretty common for all the comment boxes. You can sign up for Disqus with your email, facebook, twitter or Google plus. After signing up, you may have to verify your email address if you have signed up with an email.
Step 2: Set up Disqus

Once you login, you should see a gear icon on the top-right corner. Click on it and you’ll get a drop-down with one of the options saying Add Disqus to Site.
If it shows you a page with the heading “Engage” then click on ‘start using engage’. Now you should see a screen as shown below.
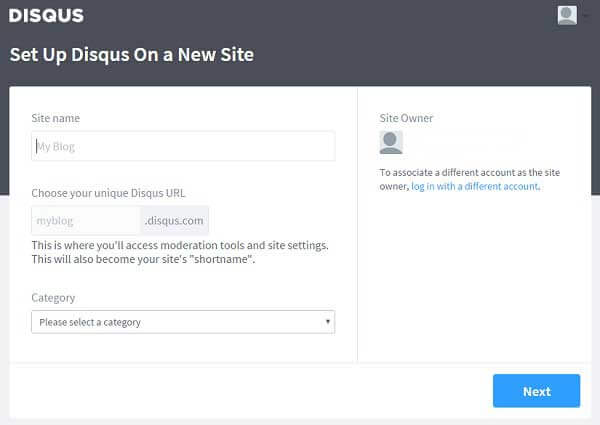
This is where you can choose a shortname for your comment box which we will be using in the next step. I’m giving my shortname as webjeda-sample
Step 3: Get the Disqus code
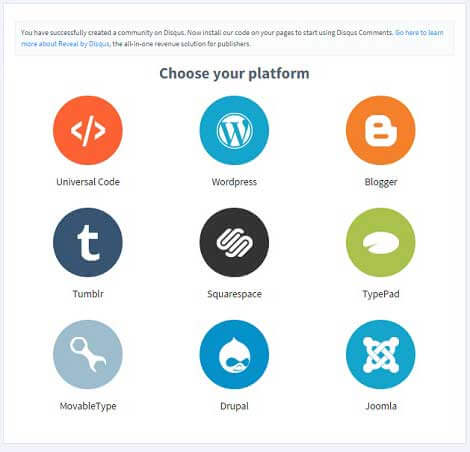
Now select the platform as Universal code and you should be redirected to the page having the actual code.
Here is a sample Universal code (script) that can be inserted into any html page.
<div id="disqus_thread"></div>
<script defer>
/**
* RECOMMENDED CONFIGURATION VARIABLES: EDIT AND UNCOMMENT THE SECTION BELOW TO INSERT DYNAMIC VALUES FROM YOUR PLATFORM OR CMS.
* LEARN WHY DEFINING THESE VARIABLES IS IMPORTANT: https://disqus.com/admin/universalcode/#configuration-variables
*/
/*
var disqus_config = function () {
this.page.url = PAGE_URL; // Replace PAGE_URL with your page's canonical URL variable
this.page.identifier = PAGE_IDENTIFIER; // Replace PAGE_IDENTIFIER with your page's unique identifier variable
};
*/
(function() { // DON'T EDIT BELOW THIS LINE
var d = document, s = d.createElement('script');

s.src = '//webjeda-sample.disqus.com/embed.js';

s.setAttribute('data-timestamp', +new Date());
(d.head || d.body).appendChild(s);
})();
</script>
<noscript>Please enable JavaScript to view the <a href="https://disqus.com/?ref_noscript" rel="nofollow">comments powered by Disqus.</a></noscript>
Insert this code wherever you want the comment box to appear.
If you want to show the number of comments anywhere on the website then you can use this code.
<script defer id="dsq-count-scr" src="//webjeda-sample.disqus.com/count.js" async></script>Disqus may not work as expected if you have compress.html active to [compress jekyll html](/compress-html-jekyll/). {: .r} And also, Google does not index Disqus blog many times. If you are very serious about your comments to be indexed then you may have to look for other options or follow this question. But Matt Cutts from Google tweeted that the Google-bot (crawler) can now index some dynamic comments!
Googlebot keeps getting smarter. Now has the ability to execute AJAX/JS to index some dynamic comments http://t.co/NsTvJExd
— Matt Cutts (@mattcutts) November 1, 2011
So there is still hope for Disqus comments to get indexed by Google.
Update
Disqus comments are now indexed by Google! Try searching a unique comment(found on any article of this blog) on google and you should get the post link on search results.
Step 4: Making use of Jekyll templates
It is not feasible to copy this code to every other blog post. That is the reason why we are creating a template. Create a new html file inside _includes folder, name it disqus.html paste the above code inside it and save. Now you can call this file anywhere in your Jekyll website with the following liquid tag to show Jekyll blog comments.
{% include disqus.html %}
If you want the comment box to appear at the bottom of all my posts, you should add the above include liquid tag to post layout which will be inside _layouts folder.
A sample post layout with Disqus would look like this
---
layout: default
---
<article id="post-page" >
    <a href=""><h2>{{ page.title }}</h2></a>
    <time>{{ page.date | date_to_string }}</time>
    <div class="content" >
            {{ content }}
    </div>
</article>
    {% include  disqus.html %}
And now you should have a comment box below every single blog post. But what if you don’t want comments on certain blog posts?!
Front matter and liquid tags can help us solve this problem.
Add this front matter to the blog posts on which you do not want comments.
---
layout: post
title: some title
comments: 0
---
Now in the post layout, add the following code
<article id="post-page" >
    <a href=""><h2>{{ page.title }}</h2></a>
    <time>{{ page.date | date_to_string }}</time>
    <div class="content" >
            {{ content }}
    </div>

 {% if post.comments != 0 %}
    {% include  disqus.html %}
 {% endif %}

</article>
Add the below front-matter to all the posts where you do not want to display the comment box. You can use this for other comment boxes as well.
comments: 0 If you want to implement Disqus using site variable which replaces Disqus shortname then use the code given below inside disqus.html. And inside _config.yml add an attribute called disqus_shortname which defines your disqus shortname.
disqus.html
<div id="disqus_thread"></div>
<script defer>
/**
* RECOMMENDED CONFIGURATION VARIABLES: EDIT AND UNCOMMENT THE SECTION BELOW TO INSERT DYNAMIC VALUES FROM YOUR PLATFORM OR CMS.
* LEARN WHY DEFINING THESE VARIABLES IS IMPORTANT: https://disqus.com/admin/universalcode/#configuration-variables
*/
/*

var disqus_config = function () {
this.page.url = PAGE_URL; // Replace PAGE_URL with your page's canonical URL variable
this.page.identifier = PAGE_IDENTIFIER; // Replace PAGE_IDENTIFIER with your page's unique identifier variable
};
*/
var shortname = {{ site.disqus_shortname }}
(function() { // DON'T EDIT BELOW THIS LINE
var d = document, s = d.createElement('script');

s.src = '//' + disqus_shortname + '.disqus.com/embed.js';

s.setAttribute('data-timestamp', +new Date());
(d.head || d.body).appendChild(s);
})();
</script>
<noscript>Please enable JavaScript to view the <a href="https://disqus.com/?ref_noscript" rel="nofollow">comments powered by Disqus.</a></noscript>
_config.yml
.
.
disqus_shortname: webjeda-sample
.
.
2. Google Plus
Google has a very minimal and elegant comment box. I have no doubt that it looks better than Disqus but it is just for Google users. One must have Google plus account to comment.

Here is the code to implement Google comments on Jekyll posts. Follow the same procedure we followed in step 4 od adding Disqus to Jekyll blog.
<script src="https://apis.google.com/js/plusone.js">
</script>
<div class="g-comments"
  data-href="{{ site.url }}{{ page.url }}"
  data-width="600"
  data-first_party_property="BLOGGER"
  data-view_type="FILTERED_POSTMOD">
</div>
Here variables should be in this format
{{ site. url }} = http://blog.webjeda.com
{{ page.url }} = /how-to-add-comments-to-jekyll/
3. Facebook Comments

Before adding facebook comments, you may have to create an app in facebook. I have explained the steps in How to add facebook like button to Jekyll.
After creating an app log on to comments plugin page.
Here you can specify your requirements like width, number of posts to appear, color-scheme etc., and hit Get code.
You should get a code similar to the below one.
<div id="fb-root"></div>
<script>(function(d, s, id) {
  var js, fjs = d.getElementsByTagName(s)[0];
  if (d.getElementById(id)) return;
  js = d.createElement(s); js.id = id;
  js.src = "//connect.facebook.net/en_US/sdk.js#xfbml=1&version=v2.5&appId=YOUR-APP-ID";
  fjs.parentNode.insertBefore(js, fjs);
}(document, 'script', 'facebook-jssdk'));</script>
The above code is just the script which doesn’t display anything. The below code is responsible for the comment box to display. You have to change the data-href to the following because it has to change for every single post.
<div class="fb-comments" data-href="{{ site.url }}{{ page.url }}" data-numposts="5"></div>Use the same method I discussed in step 4 of Disqus comments.
Finally, adding a comment box to Jekyll is easy and it can be useful for a good SEO signal if you are using a social-network comment box like facebook or Google plus.
Let me know if you were able to set up Jekyll blog comments successfully. Comment if you have any suggestions.
Thanks for reading!